Friday, December 2, 2011

Zora's Domain

So this morning I was playing my Skyward Sword and while playing I began thinking about the colours of all the different creatures and stones throughout the Zelda games. One of my favorite creatures are the Zoras, especially in Twilight Princess. Zoras are the water creatures of the Zelda games. I really loved in Majoras Mask playing as the guitar player, Mikau, after he washed up on sea. So, for this makeup tutorial I have created a bright, yet sort-of wearble look to represent the Zoras. I do know that my one eye is a bit darker then the other, I honestly don't know what happen. I like to do both eyes at the same time, but your eyes ad brows are like very, very close sisters not twins. Anyways, on to the tutorial that I have been working on making it a lot easier to follow, enjoy everyone!

Zora's are wonderful under the water and are a mixture of white and blue colours. For this look I used my amazing Lime Crime Primer, Tako by Sugarpill Cosmetics, Make Up For Ever Eyeshadow, I used my Maybelline Eyeliner and Carbon from MAC Cosmetics. I began by putting the primer all over my eye and right under my bottom lash line. Grabbing my fat eyeshadow brush, I applied Tako from my inner corners all the way to the middle of my eye. I applied quite a bit, since I wanted to get a true white to represent the Zoras. I then took my Blue eyeshadow from Make Up For Ever and applied it to the rest of my eye and took it out on a sharp edge. You may use tape to get a perfect straight, but I just eyeballed it. I took Tako one more time and started to slowly blend my white and blue to get a gradient effect. I took a blending brush and put a very little amount of Carbon on it and slowly tried to blend the blue and back on the far outer edge. Don't make it black, just make it a deep blue or even apply a deep blue if you got it! Apply a black eyeliner halfway on your eye, set it with Carbon and repeat on the top. Blend out the top with a nude color and do the same to the sharp line.

I didn't blend really blend the sharp edge, I more just softened it up. Zoras look curvy and don't really have a lot of sharp edges. I touched up a few places here and there, added a little more blue on top to make it really pop and added a few flecks of shimmer here and there. I hope this was a lot easier to read and not as confusing as my first one. I will try to make more Legend of Zelda makeup tutorials or even looks, so stay tuned!

What makeup look would you like to see me do?

Thursday, December 1, 2011

THINGS I LOVE THURSDAY

So this week has been extremely difficult for me for blogging. I have so much work and I am trying to plan out Christmas gifts. Oh, December you come way to quick. I am so indecisive and when I finally pick something, I feel unhappy with it. Anyways, from now on I am going to be blogging things I am loving or inspired by on Thrusdays. I got the inspiration from Kaeleh Bee from Little Chief Honeybee. On a side note, I would like to say that I will be doing a makeup review and tutorial for Strobe Cosmetics whenever my order gets in. I might try doing a video tutorial if my camera wants to work.


The Jem and the Holograms Series, probably ties for my second favorite cartoon show with Sailor Moon.

these amazing galaxy nails by A Cup of Jo! You can see more pictures on her blog and even a tutorial!

This Best Music Box Collection from Hayao Miyazaki and all of his films!

Lauren Conrad's amazing dip-dyed hair, makes me want to do this.

Cute husky puppies! I couldn't find the source, I know at the top right it says thgileht, but i couldn't find them.


There are so many other things I love so much, but I didn't want to post too many pictures so here are some things. These Iron Fist Wolf Beater shoes, I saw them one time at Hot Topic and haven't seen them since! Napugleon Bonapug, A drawing created by the artist Kippery on DeviantArt and Tumblr. This fantastic X-Men Rogue cosplay by Bunnyasha on cosplay.com!

What inspires you? What are you loving today?

Wednesday, November 30, 2011

Makeup for Glasses

So the other day I did a makeup look for glasses, since I will be wearing my glasses for the next month or so. I always have this problem that makeup just doesn't look right with glasses on. I usually just put on some mascara and do a winged liner, but I wanted to try something different. So my mum gave me a few of her eye shadows that she really didn't want. I was a little skeptical, mainly because it was from The Body Shop instead of Sephora or Ulta like I'm used to. I did the entire look with only 5 items. The Shimmer Cubes Palette 06 from The Body Shop, Eyeshadow Helperwaterproof eyeshadow primer from Lime Crime Makeup, Eyebrow Pencil from Sally's Beauty Supply, Tako by Sugarpill, and Stiletto Line Liquid Liner from Maybelline. I will honestly swear by the Lime Crime Makeup Eyeshadow Primer, it has to be the BEST primer that I have ever tried and I have tried most of them out there. I do like Urban Decays Primer Potion, but I feel like it only lasts a few hours unlike Lime Crimes' which happens to last me until the next day! As for my eyebrows, I really like to use just any old cheap brow pencil, I honestly don't like this one. It is a bit 'cakey' and just doesn't match my brows. Well, onto the mini-tutorial please excuse my lack of quality. note: the look is lightly glittered and a little bit lighter then what the photos show.
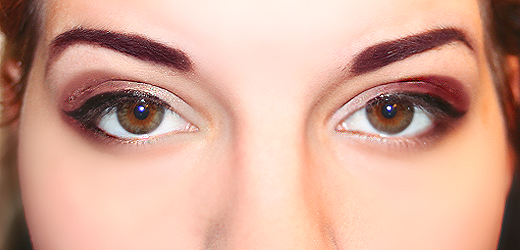


I started by applying the primer all over from the base of my eyelid to the crease. I'm not a fan of having eyeshadow all the way up to my brow, I just like to add a hint of shimmer and that's it. I use my ring finger, since it has the least amount of pressure, gently rubbing it onto my eye. I let it sit for about three seconds and then take a eyeshadow brush and take a little bit of Tako and put it on my the inner half of my eyes and lightly put it underneath my bottom lashes. I only take a lit of the eyeshadow, because the colour is so vivid and extreme that it only takes a tiny bit. When I put on the eyeshadow I like to gently pat it onto my eye with the brush, I feel like I get the full colour when doing so. I next take the lightest colour of the Shimmer Cube Palette and sparingly apply it right onto of Tako, except on the inner corners. The shimmer cube actually makes Tako get this really shimmery, light pink colour. Next, put some of the bright golden color and apply it on the center of my eyelid. I don't really blend until the end, it's a personal thing, but if you want you can already blend with a blending brush or even a a q-tip. The gold is a little bit dark, but it is very light as well. I take the darkest colour of the quad and put it on the outer corner bring it around underneath my eyelashes as well as along my crease. Lastly, I start to do all the blending. I can't really explain how I do my blending, I just like to make it so that one colour gently flows into the next and the darkest colour is blended along it's edges. I reapply colors where needed and then begin to do a winged liner.
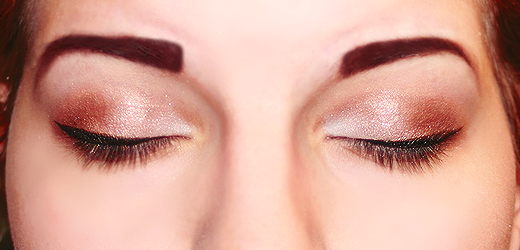


Now when I do winged liner I like to start from the beginning of my iris, slowly building up to the outer edge of my eye. I also like to put it right on my eyelash line, about a quarter of the way. You can do your eyeliner how ever you prefer or not where it at all! For my eyebrows, I really like them bold and dark. I take my eyebrow pencil and gently sketch out my eyebrows and fill in the bald spots of my eye. I only recently started doing my eyebrows, so I am probaby not the best person to give advice about eyebrows ha ha. What I do next is take any kind of brush and just brush through the eyebrows spreading the eyeliner lightly and making them more full. For this look I didn't do my lips, mainly because I thought it would look a lot better with plain lips. Well, that's it! This look is really great with glasses or even no glasses. I was hoping that it would turn out good and it definitely did! This the first tutorial I have ever done, I will do more in the future and hopefully they will be a lot easier to follow. Let me know what you think, enjoy!

Sunday, November 27, 2011

Welcome

Hey guys! Well, this is my simple blog and I really hope everyone likes it! I kept the layout quite simple for the beginning, just to ease into everything. I'll probably change it a christmas-esque layout soon. Anyways, I am just posting this to say hello and welcome to my blog. My name is Mae and I'll be your guide through my life. I really want to do makeup look, reviews, fashion, movies, music, and do-it-yourself items. I am 18 years old and just gliding through and taking notes about everything wonderful. I will stop blabbing now, but I hope you do check out my blog and let me know definitely what you think!

Maeflowerss <3